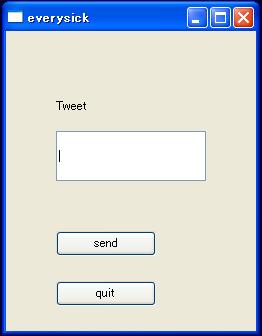
PyQtとTweepyを使った簡易Twitterクライアント
前回の発展編みたいなものです。
フォームに打ち込んだツイート内容を送信するところまでやります。
PyQt (python Qt)
QtっていうのはC++で書かれたフレームワークの一つで、
GUIやSQLなど様々な機能を持ったものです。
今回は機能の一つであるQtGuiを使ってPythonの簡単なフォームアプリケーションを作りました。
でもPython2系だとQtを使うのに結構不便あるらしいのでしっかりやりたい方はPython3系を使うのをおすすめします。
(ライブラリを使うのでこの記事では2系を使います)
環境
前回と同じで
Python2.7.3
windowsXP-32bit-SP3
プログラムの流れ
①起動と同時にブラウザを開きユーザにアプリケーションの認証をさせる
②発行されたPINコードを入力させるフォームであるform1を表示。
OAuth認証を行いAccessTokenを獲得
③form1を閉じ、ツイートの入力画面のあるform2を開く
④ユーザの入力した文字をtweepyを使って送信する
プログラム
各種ライブラリのimportをし、
グローバル変数にConsumerKey,ConsumerSecret,OAuthHandlerを宣言しておく
(引数渡したりとか面倒だったので)
#coding: UTF-8

#systemライブラリ
import sys
#tweepyライブラリ
import tweepy
#ブラウザを開くためのライブラリ
import webbrowser
#PyQtのQtGui,QtCoreをimport
from PyQt4 import QtGui,QtCore

#developerのconsumerkey
consumer_key  = "consumerkey"
#developerのconsumersecret
consumer_secret = "consumersecret"
#oauth認証に必要なハンドルの宣言
auth=tweepy.OAuthHandler(consumer_key,consumer_secret)
form1のクラス
AccessTokenの取得までを行う
#form1クラス
class Form1(object):
	#コンストラクタ
	def __init__(self):
		#form1の宣言
		self.form1=QtGui.QWidget()
		#form1のサイズ指定
		self.form1.resize(200,100)
		#form1のタイトル指定
		self.form1.setWindowTitle('Setting Acount')

		#Buttonを宣言し、'send'とButtonに表示
		self.button1=QtGui.QPushButton('send',self.form1)
		#Buttonの位置を指定
		self.button1.setGeometry(50,63,100,25)

		#入力するBOXであるLineEditを宣言
		self.edit1=QtGui.QLineEdit(self.form1)
		#LineEditの位置を指定
		self.edit1.setGeometry(50,25,100,30)

		#button1を押したときのイベントをclick_forms_ok_buttonメソッドに指定
		self.button1.clicked.connect(self.click_forms_ok_button)
		#form1を表示
		self.form1.show()

	#pinコードを受け取りaccesstokenを取得するメソッド
	def get_accesstoken(self,pin_key):
		#accesstokenの取得
		auth.get_access_token(pin_key)

	#button1を押した時のイベントメソッド
	def click_forms_ok_button(self):
		#pinコードをLineEditから読み取る
		pin=self.edit1.text()
		#get_accesstokenメソッドにpinコードを渡してaccesstokenを獲得
		self.get_accesstoken(pin)
		#accesstokenを取得したのでform1を閉じる
		self.form1.close()
form2のクラス
ツイート送信を行う
#form2クラス
class Form2(object):
	#コンストラクタ(ユーザIDを受け取る)
	def __init__(self,userid):
		#form2の宣言
		self.form2=QtGui.QWidget()
		#form2のサイズ指定
		self.form2.resize(250,300)
		#form2のタイトルをユーザIDに指定
		self.form2.setWindowTitle(userid)


		#labelの宣言・'Tweet'とテキストを指定・位置を指定
		self.state_label=QtGui.QLabel(self.form2)
		self.state_label.setText('Tweet')
		self.state_label.setGeometry(50,50,100,50)

		#ツイートを入力するLineEditの宣言・位置を指定
		self.edit1=QtGui.QLineEdit(self.form2)
		self.edit1.setGeometry(50,100,150,50)

		#ツイート送信buttonの宣言・'send'とテキストを指定・位置を指定
		self.button1=QtGui.QPushButton('send',self.form2)
		self.button1.setGeometry(50,200,100,25)

		#ツイート送信buttonの宣言・'quit'とテキストを指定・位置を指定
		self.button2=QtGui.QPushButton('quit',self.form2)
		self.button2.setGeometry(50,250,100,25)

		#ツイートを送信するためのapiハンドルを取得
		self.api=tweepy.API(auth)

		#button1を押したときのイベントをsend_tweetメソッドに指定
		self.button1.clicked.connect(self.send_tweet)
		#button1を押したときのイベントをend_clientメソッドに指定
		self.button2.clicked.connect(self.end_client)
		#form2を表示
		self.form2.show()

	#button1を押した時のイベントメソッド
	def send_tweet(self):
		#とらい!
		try:
			#edit1に入力された内容をunicodeに変換してpostに入れる
			post=unicode(self.edit1.text())
			#postをツイートとして送信
			self.api.update_status(post)
		#例外発生
		except tweepy.error.TweepError, e:
			#例外発生したときのステータス
			print str(e.response.status)
			#例外発生した時の理由
			print str(e.response.reason)
		else:
			#無事送信が完了したら出力
			print 'Accept Send'
		#edit1の内容をクリアする
		self.edit1.clear()

	#button2を押した時のイベントメソッド
	def end_client(self):
		#form2を閉じて終了する
		self.form2.close()
mainメソッド
form1の表示→form2の表示→終了
までの流れをここで行う
#main
def main():
	#別途説明
	QtCore.QTextCodec.setCodecForCStrings(QtCore.QTextCodec.codecForName('unicode'))

	#ユーザにアプリケーションを認証させるためのurlを取得
	pin_url=auth.get_authorization_url()
	#ブラウザでpin_urlを開く
	webbrowser.open(pin_url)

	#Guiを使うためにシステムに宣言
	app=QtGui.QApplication(sys.argv)
	#Form1クラスのfirstを宣言(form1が閉じるまで実行)
	first=Form1()
	#アプリケーションの終了
	app.exec_()

	#獲得したaccesstokenでusernameを取得
	username=str(auth.get_username())
	#Form2クラスのsecondを宣言
	second=Form2(username)
	#システムに全アプリケーションの終了を返す
 	sys.exit(app.exec_())
までがコードの大まかな部分になります。
別途説明の部分
↓ここの部分で
#edit1に入力された内容をunicodeに変換してpostに入れる
post=unicode(self.edit1.text())
#postをツイートとして送信
self.api.update_status(post)
PyQtのQLineEditやQLabelに入力された内容はQStringという特殊な型を持って取得されます。
そのため日本語をunicodeに変換しようとしても文字化けしてしまいます。
もちろん日本語のツイート送信にはasciiからunicodeに変換する必要があるのでこのまま送るわけにもいきません。
ここでこの一文についての説明をします
QtCore.QTextCodec.setCodecForCStrings(QtCore.QTextCodec.codecForName('unicode'))
QtCoreからQStringなどの特殊な型に対してunicodeへ変換することを許可させることができます。
あんまり詳しいことがわかってないのでなんとも言えませんがとりあえずこれを書いておけば日本語のツイートを送信することができます。
プログラム全貌
#coding: UTF-8

#systemライブラリ
import sys
#tweepyライブラリ
import tweepy
#ブラウザを開くためのライブラリ
import webbrowser
#PyQtのQtGui,QtCoreをimport
from PyQt4 import QtGui,QtCore

#developerのconsumerkey
consumer_key  = "consumerkey"
#developerのconsumersecret
consumer_secret = "consumersecret"
#oauth認証に必要なハンドルの宣言
auth=tweepy.OAuthHandler(consumer_key,consumer_secret)

#form2クラス
class Form2(object):
	#コンストラクタ(ユーザIDを受け取る)
	def __init__(self,userid):
		#form2の宣言
		self.form2=QtGui.QWidget()
		#form2のサイズ指定
		self.form2.resize(250,300)
		#form2のタイトルをユーザIDに指定
		self.form2.setWindowTitle(userid)


		#labelの宣言・'Tweet'とテキストを指定・位置を指定
		self.state_label=QtGui.QLabel(self.form2)
		self.state_label.setText('Tweet')
		self.state_label.setGeometry(50,50,100,50)

		#ツイートを入力するLineEditの宣言・位置を指定
		self.edit1=QtGui.QLineEdit(self.form2)
		self.edit1.setGeometry(50,100,150,50)

		#ツイート送信buttonの宣言・'send'とテキストを指定・位置を指定
		self.button1=QtGui.QPushButton('send',self.form2)
		self.button1.setGeometry(50,200,100,25)

		#ツイート送信buttonの宣言・'quit'とテキストを指定・位置を指定
		self.button2=QtGui.QPushButton('quit',self.form2)
		self.button2.setGeometry(50,250,100,25)

		#ツイートを送信するためのapiハンドルを取得
		self.api=tweepy.API(auth)

		#button1を押したときのイベントをsend_tweetメソッドに指定
		self.button1.clicked.connect(self.send_tweet)
		#button1を押したときのイベントをend_clientメソッドに指定
		self.button2.clicked.connect(self.end_client)
		#form2を表示
		self.form2.show()

	#button1を押した時のイベントメソッド
	def send_tweet(self):
		#とらい!
		try:
			#edit1に入力された内容をunicodeに変換してpostに入れる
			post=unicode(self.edit1.text())
			#postをツイートとして送信
			self.api.update_status(post)
		#例外発生
		except tweepy.error.TweepError, e:
			#例外発生したときのステータス
			print str(e.response.status)
			#例外発生した時の理由
			print str(e.response.reason)
		else:
			#無事送信が完了したら出力
			print 'Accept Send'
		#edit1の内容をクリアする
		self.edit1.clear()

	#button2を押した時のイベントメソッド
	def end_client(self):
		#form2を閉じて終了する
		self.form2.close()

#form1クラス
class Form1(object):
	#コンストラクタ
	def __init__(self):
		#form1の宣言
		self.form1=QtGui.QWidget()
		#form1のサイズ指定
		self.form1.resize(200,100)
		#form1のタイトル指定
		self.form1.setWindowTitle('Setting Acount')

		#Buttonを宣言し、'send'とButtonに表示
		self.button1=QtGui.QPushButton('send',self.form1)
		#Buttonの位置を指定
		self.button1.setGeometry(50,63,100,25)

		#入力するBOXであるLineEditを宣言
		self.edit1=QtGui.QLineEdit(self.form1)
		#LineEditの位置を指定
		self.edit1.setGeometry(50,25,100,30)

		#button1を押したときのイベントをclick_forms_ok_buttonメソッドに指定
		self.button1.clicked.connect(self.click_forms_ok_button)
		#form1を表示
		self.form1.show()

	#pinコードを受け取りaccesstokenを取得するメソッド
	def get_accesstoken(self,pin_key):
		#accesstokenの取得
		auth.get_access_token(pin_key)

	#button1を押した時のイベントメソッド
	def click_forms_ok_button(self):
		#pinコードをLineEditから読み取る
		pin=self.edit1.text()
		#get_accesstokenメソッドにpinコードを渡してaccesstokenを獲得
		self.get_accesstoken(pin)
		#accesstokenを取得したのでform1を閉じる
		self.form1.close()


#main
def main():
	#別途説明
	QtCore.QTextCodec.setCodecForCStrings(QtCore.QTextCodec.codecForName('unicode'))

	#ユーザにアプリケーションを認証させるためのurlを取得
	pin_url=auth.get_authorization_url()
	#ブラウザでpin_urlを開く
	webbrowser.open(pin_url)

	#Guiを使うためにシステムに宣言
	app=QtGui.QApplication(sys.argv)
	#Form1クラスのfirstを宣言(form1が閉じるまで実行)
	first=Form1()
	#アプリケーションの終了
	app.exec_()

	#獲得したaccesstokenでusernameを取得
	username=str(auth.get_username())
	#Form2クラスのsecondを宣言
	second=Form2(username)
	#システムに全アプリケーションの終了を返す
 	sys.exit(app.exec_())

if __name__ == '__main__':
    main()
例外処理とかはほとんど入ってないです
勉強用に作ったので
フォーム画面
デザインにはほとんど凝ってないので・・・(


またデザインについてはQt Designerという便利なものがあるのでコードで設計するのが面倒だったらそっちを使えばいいと思います。